Creating a Paper Flower Backdrop – FAQ

I get a lot of questions asking how I create my paper flower backdrops. And I mean a lot of questions. And usually I’m always happy to answer them! But I’ve been busy with creating more backdrops, and I just started a new job as well! So I thought it would be easiest for me to create this blog to answer some of my most frequent questions. If I haven’t answered your question please leave a comment below. I always try to answer quickly. Make sure you turn on email alerts for replies!

If you’re looking for more information, I will be putting together a full tutorial. And I mean full walk through with what supplies to purchase, videos and photos. This will be a tutorial that has to be purchased. I’m thinking the price will range from $50 – $75. If you’re interested in being alerted when it is available to purchase please email me at floralbyemilyjane@gmail.com with the subject line, “backdrop tutorial.” I have chosen to make this a paid tutorial because I have spent the last year perfecting how I create my backdrops and sharing that knowledge is valuable.

You can also get more FREE tools, tips, and tutorials in my Facebook Group.


So here it is my paper flower backdrop FAQ:

  • How do you hang your paper flowers on the backdrop?
    • I glue all of my flowers onto poster boards, then hang the boards onto the backdrop using wire. (For any more info on this part of the process, you will need to purchase the tutorial)
  • Do you glue the flowers onto the poster at the event or before?
    • Always always always before the event. I would never risk something going wrong day of unless absolutely necessary. I have almost everything done before I arrive to set up. I may bring extra leaves and small flowers to fill any empty spaces if needed.
  • How long does it take you to create a backdrop?paper flower backdrop chicago
    • The one I just created took me two nights, maybe a total of 8-10 hours. But I always add a disclaimer, I like to take small breaks so I don’t get burned out. I’ll watch TV, play some video games, go on my phone, or cook dinner to take a short break.
  • How much paper does it take to make a backdrop?
    • I’m honestly not sure. I haven’t really kept track. I have a good amount already on hand so I never have to go and purchase all the paper I need for one backdrop. If you’re new and creating one, I’d say maybe 250-500 sheets. I know that’s a large range but it depends on so many things. How many flowers, how many layers and petals on each flower, what kind of centers and leaves you make.
  • Where do you get your backdrop and stand?
    • They can be purchased from event decor companies, amazon etc.
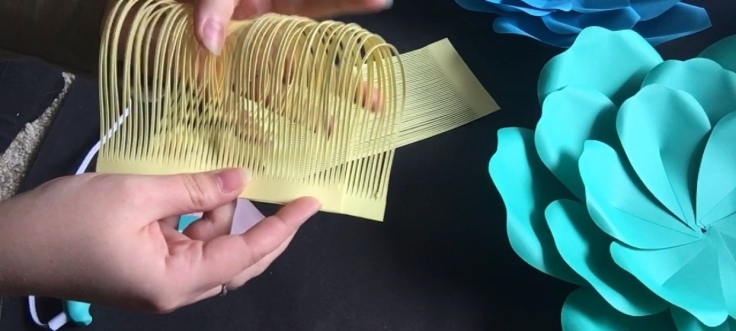
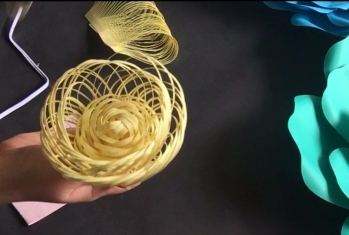
  • Where do you get your templates?
    • I create them. A few can be purchased on my Etsy shop. Support small businesses and purchase from other paper florists! If you can’t find what you’re looking for from me, there are a bunch of great ones on Etsy.
  • What kind of paper do you use?
    • Almost exclusively 65 pound cardstock from Michael’s.
  •  What kind of glue do you use?
    • ArtMinds glue gun and glue sticks from Michael’s.
  • How do you transport your backdrops?
    • I have a midsize SUV and have learned how big I can make my backdrops to make sure they can fit. My backdrop curtain folds and my backdrop stand folds into an easy to carry bag.

I hope this helps and gets you started creating your own paper flower backdrops. If you have any more questions leave a comment below!

Chicago Paper Flower Bridal Shower

This bridal shower was amazing!! Totally Pinterest worthy so I just had to share. I was hired by the mother of the bridal for one of my biggest events yet! She had a vision that she wanted to bring to life and I think the two of us made an amazing team to make it happen. The colors were pink, gold and champagne.

All of my paper was purchased from Michael’s and these are some of my favorite colors to work with. They compliment each other so well! The pink and champagne are gorgeous but subtle and that gold is bright and eye catching.

This event also featured my giant free standing flowers. I’ve gotten a lot of questions about them, how I made them and if they can be purchased and more. I will be creating a tutorial that can be purchased in the near future. And for the time being, they are only available to rent. If you’re interested in renting my giant free standing flower or a custom backdrop please send me an email at floralbyemilyjane@gmail.com.

Kate Spade Bridal Shower Inspiration


This bridal shower was perfect. Perfectly themed, perfect decor, perfect venue, it was GORGEOUS. It was an absolute honor to be part of it and I hope it brings you tons of Kate Spade inspiration!

This paper flower backdrop features a variety of my templates and a black and white striped backdrop, perfect for any Kate Spade themed event. Matching with the black and white striped runners and pink napkins, plus beautiful fresh flowers. It was a dream and to be honest, this is exactly what I would want my bridal shower to look like!

A similar pink Kate Spade paper flowers can be purchased here.

To inquire about your Chicago paper flower backdrop rental, please contact me at FloralbyEmilyJane@gmail.com.

Photo Tutorial – Ruth Paper Flower Template

When I first started my paper flower business I was unsure of what templates to use. I wasn’t sure if I wanted to purchase some or if I should design my own. So I tried out a few designs and really loved the way they turned out.

A year later I have started making tutorials for my templates and now sell them on my Etsy shop!

If you’re looking for some inspiration you can visit my Facebook or Instagram pages.

Or, visit a few of my blogs!

Paper Flower Photo Tutorial - Ruth.jpg

  1. Gather supplies. The supplies you need are
    • The Ruth template. You can purchase it here.
    • Paper. I used 8.5″ x 11″ Recollections paper from Michael’s
      • 12 sheets for the flower and 1 for the base (or 1 half piece)
    • Hot glue gun and hot glue sticks
    • Sciccors
    • Pencil
    • Paper flower center
    • Something to curl your petals – large glue stick, bone shaping tool, etc.
  2. Trace your petals. You’ll need 6 of each size
  3. Cut out the petals
  4. Cut a base and cut a slit down the petals. The longer the slit, the lower your flower will sit. The shorter the slit, the taller your flower will sit. I prefer longer slits.
  5. Curl the petals in the shape you prefer. For this particular tutorial I shape one side of petal backwards and one side forwards.
  6. Glue the slit. Place glue on the left slit and fold over the right slit.
  7. Glue each layer of petals onto the base. I taper each layer of petals so they don’t lay directly on top of each other.
  8. Add your center!

If you’d like the full set of instructions, please purchase the template here.

IMG_0634.JPG

Photo Tutorial – Hillary Paper Flower

When I first started my paper flower business I was unsure of what templates to use. I wasn’t sure if I wanted to purchase some or if I should design my own. So I tried out a few designs and really loved the way they turned out.

A year later I have started making tutorials for my templates and now sell them on my Etsy shop!

If you’re looking for some inspiration you can visit my Facebook or Instagram pages.

Or, visit a few of my blogs!

Paper Flower Tutorial Chicago

  1. Gather supplies. The supplies you need are
    • The Hillary template. You can purchase it here.
    • Paper. I used 8.5″ x 11″ Recollections paper from Michael’s
      • 12 sheets for the flower and 1 for the base (or 1 half piece)
    • Hot glue gun and hot glue sticks
    • Sciccors
    • Pencil
    • Paper flower center
    • Something to curl your petals – large glue stick, bone shaping tool, etc.
  2. Trace your petals. You’ll need 6 of each size
  3. Cut out the petals
  4. Cut a base and cut a slit down the petals. The longer the slit, the lower your flower will sit. The shorter the slit, the taller your flower will sit. I prefer longer slits.
  5. Curl the petals in the shape you prefer.
  6. Glue the slit. Place glue on the left slit and fold over the right slit.
  7. Glue each layer of petals onto the base. I taper each layer of petals so they don’t lay directly on top of each other.
  8. Add your center!

If you’d like the full set of instructions, please purchase the template here.

Paper flower tutorial chicago

Moana Birthday Party Inspiration

Ahhhh, a little tropical inspiration. Who doesn’t love a super cute Moana party?!

I once again had the opportunity to work with Hu’s Assisting. If you haven’t seen their work, check them out. Here are a few of their events I’ve had flowers at; White and Gold Birthday Party, Tiffany’s Sweet 16 Party.


If you’re in the Chicago area and are looking for a set of custom paper flowers please reach out to me! I would love to assist you in creating the perfect set of paper flowers for your upcoming wedding or event or home decor!

How to Make a Paper Flower Spiral Center

I love using this breathtaking center for my large flowers. It’s such a statement piece and really easy to make! To create this center you will need to own a cutting machine. I personally use a Cricut Explore One and this design is available in Design Space.

Supplies

  • 3 sheets of 8.5″ x 11″ paper (you can also use 12″ x 12″)
  • Purchase the Marigold image in Design Space for 99 cents
  • Hot glue gun & hot glue sticks
  • Cricut or other cutting machine

Watch the full tutorial video on my YouTube Channel. Or see written instructions below. (Watch the video, trust me! It makes more sense!) Image-1.png

Start out by cutting the paper with your Cricut. Purchase the Marigold image and edit the dimensions. For this exact look you will need one piece cut to 7.741″ W x 6.884″ H for the center. (Make sure you unlock the dimensions before you enter them) For the two pieces that wrap around the center, cut those to 10.553″ W x 4.984″ H.

Now you should have your three pieces cut and are ready to assemble. Start out with your one wider piece for the center. Fold it in half but don’t line up the corners. Take one of the corners and bring it in about 1″ – 1.5″ and then glue it. This creates the tapered look. Set that piece to the side and do the same thing with the other two pieces. Taper the corners so they don’t line up directly.

Paper flower spiral center
When gluing the pieces in half together, make sure you do not line up the corners. Bring one of the corners in about 1″-1.5″ to create this look.
Paper flower spiral tutorial
This is how it looks with the center piece and one of the larger pieces wrapped around it.

Next, take your center piece and wrap it up. Twist it inwards all the way. It will start to look like a cone or an orb depending on how tight you twist it. Make sure you glue along the edges to secure it in place. Once that is done, take one of the two larger pieces that will wrap around your center piece. Place the center on the edge of the larger piece and glue it. Then wrap the large piece around the smaller center and repeat this step with your second larger piece.

After you have all 3 pieces assembled and glued together, use your hands to push the outer layers of the spiral down. But don’t forget to get creative and try your own versions!


Custom Bedroom Set

I love when my clients send me photos to color match to. Not only does it make my job easier because I’m such a visual person, but it also helps me make sure that I can do my best to match the colors perfectly.

For this set I chose to use two different shades of pink to match the pink flowers on the pillow. For the blue, I chose a blue that was slightly brighter than the blues on the pillow because I saw in the background that the walls are also a soft blue. So I wanted to make sure that the flowers stand out in the room.

This custom set of 5 flowers was purchased on my Etsy Shop, and it’s only $56!


To order a custom set, visit my etsy shop or email me at FloralbyEmilyJane@gmail.com.

Paper Flower Nursery Decor for Sisters

A few months back I had the opportunity to make two sets of paper flowers for a pair of sisters. Mom ordered these sets of 5 flowers to match their rooms and I was lucky enough for her to send me photos of the flowers hung in their rooms!

These sets are my set of 5 flowers. This set comes with two 19″ – 20″ large flowers, one 15″ medium flower, two 10″-12″ small flowers, and a set of leaves to match. This set of 5 flowers is $56 and is perfect for nurseries because there aren’t too many flowers where it can be overwhelming for small spaces, but they’re still absolutely breathtaking!


To hang a set of flowers on a wall, I recommend using a set of command strips. To hang the leaves, cut the strips down to fit the back and stick! It’s so simple and mess free!

To order your custom set of nursery paper flowers contact me at floralbyemilyjane@gmail.com.

Paper Flower Tea Party

This super cute paper flower tea party was hosted by Crystal of Legacy Wood Designs. Crystal won a contest I hosted a little while back and won some super cute stemmed paper flowers. And I absolutely love the way she used them!

SHE THREW A TEA PARTY! Crystal makes beautiful wood signs that make perfect home decor, or are perfect for cute events like this! And she makes wedding signs too! Take a look at the photos below! And if you can’t tell, her photography skills are pretty on point too.

To check out more of her work or to purchase a sign, visit her Etsy shop


To inquire about paper flower orders contact me at FloralbyEmilyJane@gmail.com.

Create a website or blog at WordPress.com

Up ↑